If you’re looking to build a healthy nest egg for your future, then investing in property can be a fantastic way to make a profit. Securing a property that requires some improvement, in the right location, could be your fast-ticket route to building a property portfolio in as little as five years.
The secret to this property fast-track is a strategic renovation. A renovation is an excellent way to increase the value of a property at a faster rate than by simply hoping and praying that the market will naturally grow.
So, what do you do with your property after your renovation is complete? Well, you leverage it to fund your future property investments.
I saved $45,000 for my first deposit and used equity created through my renovations to fund the deposit, buying costs and renovations for every subsequent property. Knowing your long-term goals is essential and should be determined even before you choose the suburb you want to invest in, because picking the right location will help ensure your renovation dollars are well spent.
Here, I explain my tips for making sure that you get the most out of your completed renovation and boost that equity number as high as possible.
 Step one: Take stock of what you did
So your renovation is finally finished! Your blood, sweat and tears were poured into your project and you should be really proud. Now, the next step is to grab a notebook and take stock of every single improvement you made to the property.
Walk through the property and list the changes you made. Nothing is too big or too small to note down, as you will use this information to prepare an official valuation document. This will be your key to determining how much value you have added to the property. The specifi c details of the property itself, the completed renovation and the comparable sales are just some of the main things you need to include in this document, and they give you an objective perspective.
Top tip
I have included a valuation template in my course, The Ultimate Guide to Renovation. So often I see a great renovation but then when I look at the valuation the numbers just don’t match up. Renovation is only half of the process of creating equity – you must follow through and make it as easy as possible for the valuer to see the dollar value in your improvements, otherwise you could find that you’re not much better off than when you started.
Step two: Book your valuation
Speak to your broker about organising an official valuation to determine exactly how much equity you have created and how much you can access. You may find that you are able to pull this equity out straight away to fund your next project.
You want the valuer to walk through and see the changes that have been made, rather than simply doing a curbside valuation – after all, this will not reflect the amazing renovation you have done.
Remember, the valuer will know the area (usually) and already have a figure in mind for how much your property is worth, simply based on the address and rough features. So they are not going to know what has gone on behind doors if they don’t go inside.
Top tip
A valuation typically costs between $300 and $600, and your broker may suggest that you pay for it yourself. If you hire your own valuer, you have more input. Your broker can assist you in selecting which valuer you should hire. After all, if you use the same valuer that your lender uses, you might find that you are locked into a disappointing result, and you want the valuation to reflect the best of your hard work.
 Tax tip
The cost of hiring a valuer for an investment property could be a tax-deductible expense, so be sure to hand the invoice over to your accountant at the end of the financial year.
 Step three: Get the right valuation
Bank valuation systems are automatic. Once a valuation is ordered, a company is sent a notice to conduct a valuation.
If your loan-to-value ratio is below 80%, there is generally little risk to the lender that property values will drop by 20% and leave them with a mortgage higher than the value. Therefore, they don’t require a full valuation, and the valuer will more than likely just do a drive-by or a desktop valuation.
However, these types of valuations do not indicate that any renovation has taken place. At most, the effect of the renovation is minimised.
You need to insist on a full valuation that explores all aspects of the home and allows you to bring to light all the changes that can conceivably increase your property’s appeal.
Top tip
Prior to a valuation, I prefer to have professional real estate photographs taken, even if my strategy is renovating to rent. Hiring a professional photographer can cost as little as $150 and gives me professional images that I can use for the valuation document. Photographs also help market the property to quality would-be tenants. There are several photography services available out there that provide reasonable rates and packages – the important thing is to know how you want the photographs to look.

Step four: Ready your property for valuation
Staging is another thing you need to think about before a valuation. It’s been consistently shown that houses staged with rental furniture sell and, I believe, also achieve far higher valuations than those that aren’t furnished.
We typically linger longer when inspecting a property that is furnished compared to one that is empty, because there is a lot more to see and experience. You are essentially creating a scene and atmosphere, and it’s crucial to present the property to a valuer in its best possible light.
Staging can be done for under $5,000, and it doesn’t have to be limited to property sales. Even when renovating to rent I would consider staging a property, because you can then retain the furniture you hired for the rental opens. This can attract more potential tenants.
Top tip
One of the recent alternatives to staging with furniture is ‘virtual staging’. It is a lot cheaper, and some new online property management companies will even provide this service, which usually costs less than $300, for free. Virtual staging will not influence the valuer when they are walking through the property, but it can get more potential tenants to turn up to a property inspection. In addition, the images you can generate can be included in the valuation document and rental listings.
 Step five: Prepare your official valuation document
First you should start with an overview of the property – remember, they know what you bought it for. Second, show your knowledge of the area and the major demographic (the typical buyer or renter) to highlight how your property is a fit renovation for the market. Third, include a list of all the changes you made, including amazing before-and-after photos.
Then add in all the data you’ve compiled on comparable sales and list the size of the block. Indicate how your property matches up with others in the same area in terms of the interior, the exterior, and factors like the number of bedrooms. If there has been a recent sale, provide details of the real estate agents involved so that the result of the transaction can be verified.
Top tip
It’s important to include properties that are superior to yours as this shows your professional objectivity and suggests that you definitely did your research on the area. Furthermore, content aside, you also need to ensure that your valuation document is clean and crisp. Have it printed and bound into a professional-looking folder to show the valuers that you mean business. Include quality colour pictures as well so that the valuers are able to get a good idea of what you’ve done.
The secret to this property fast-track is a strategic renovation. A renovation is an excellent way to increase the value of a property at a faster rate
Step six: Presenting the valuation document
There is a fine line here, so tread carefully. You don’t want to come across like you are telling the valuer how to do their job – it’s more along the lines of: “I have put together this document for you that describes all of the features of the property and any other relevant information. If you have any questions at all during your inspection or any time, please don’t hesitate to ask”.
The aim here is to make a valuer’s job easier by giving them as much information as you can to assist in the valuation. It’s best if you can provide the valuers with a copy prior to the valuation, as well as have the real estate agent escort them through the property. Ensure that everyone is on the same page regarding what’s there.
Top tip
Giving valuers a valuation document during the inspection provides them with a guide of sorts that they can refer to as they check out the property. While you can complete the perfect strategic renovation, if you don’t keep up the momentum when the time comes to get the property valued, then you could find your property undervalued by the bank and your dreams of future property investment trapped in the unacknowledged improvements the valuer missed in their report.

Step seven: Accessing the equity
If you have added value to a property through a strategic renovation, you are going to create equity. This method is the second-quickest way to add equity immediately to a property. The quickest way to add equity to a property is when you buy it below the market value.
You can access the equity you have created either by selling the property or borrowing against the property. With the renovating-to-sell strategy, the profit from your renovation will go directly into your bank account. However, for most people who decide to renovate to hold and rent, there is at least one step they need to take before they have cash in their account – and this is refinancing.
Top tip
When accessing equity added through renovation, you will often be limited to 80% of the new value of the property. More importantly, you will only be able to access this profit if you can afford to service all of the debt on the renovated property. The crucial thing to note is that every lender will calculate how much you can borrow differently. Getting your finances set up before you buy is critical to being able to release the equity you create. You don’t want to have to change lenders, which could be costly
Step eight: Buy smart
One of the most overlooked benefits of a strategic renovation that targets the typical renter is that you can ask for a higher rent. And if you make your tenants happy, they will stay longer, reducing your vacancies, loss of rent, and the costs of relisting and renting.
In a slowing market, not only can a strategic renovation allow you to increase the rent and your income to improve your borrowing capacity, but it can also protect you from negative equity. For instance, one of our Perth-based renovation students shared with us that, while some houses on their street were now in a negative equity position – where the loan was higher than the property’s value – their renovation had allowed their property to stay in a positive position.
Top tip
In doing a strategic renovation for equity, you should aim to get back at least $2 for every $1 spent. However, in some suburbs, the values of renovated and unrenovated properties just do not differ enough to allow you to make money – we call this a pricing disparity. Also, if your strategy is to flip/renovate and sell the property, there are a lot of extra costs involved in the process, so you have to be vigilant.
CASE STUDY
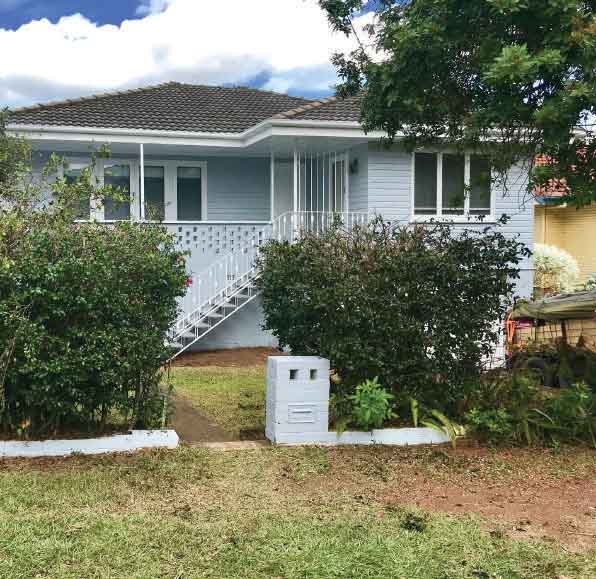 For 25 years, Russell and Heather feared committing to property. But when they finally took the leap, they found immediate success, adding $8 in value for every renovation dollar spent
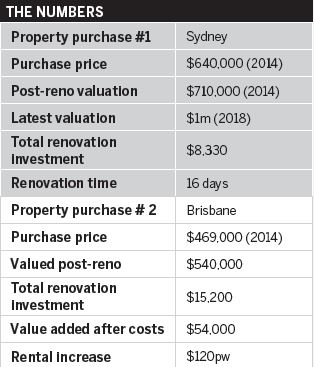
Russell and Heather had been trying to purchase their first property for over 25 years but backed down every time they got close due to their fear of uncertainty. It wasn’t until 2014 that they made the commitment to purchase a run-down bungalow in Preston, Victoria, after graduating from Jane SlackSmith’s The Ultimate Guide to Renovation course.
“We did this small little renovation in 16 days with a budget of less than $10,000. We made $62,000 in that period,” Russell says.
He and Heather refreshed the entire property, including the facade, and they were able to get a return of roughly $8 for every dollar spent on the cosmetic refresh. Key to achieving such an increase in return was the valuation document Slack-Smith and her team helped the couple prepare.
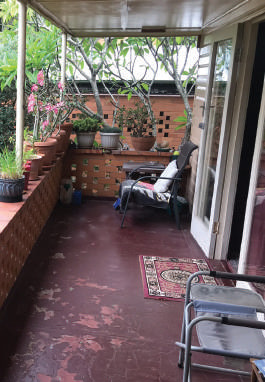 “It was essential that the valuation document explained how the property was before, what it’s changed into and how it stacked up against the other properties in the area. So we just followed the process and used the valuation document she provided,” Russell says.
In the most recent valuation of the Preston property, the bank valued the house at over $1m, bringing the couple’s total profit on the renovation to over $298,000, in addition to the first $62,000.
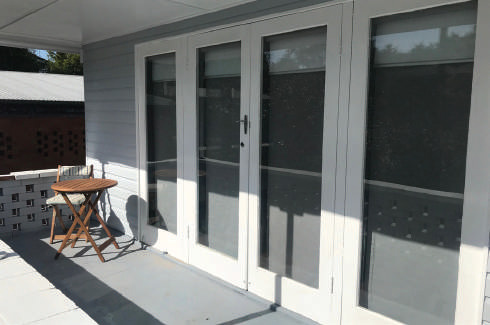 A good document needs to give the valuer an overall picture of the property, so include a renovation summary detailing the status of the property before the renovation, any improvements made, post-renovation photos, comparable sales and rental appraisals,” Slack-Smith says. With the equity created from their first successful property investment and renovation, Russell and Heather replicated the results with their second investment property in Brisbane. “One property purchase and one renovation changed our lives,” says Russell.

media commentator and creator of the
FREE video course: How to Find, Renovate and Profit from Run-Down Properties.
For more information visit freerenocourse.com.au.
Disclaimer: All products and prices listed are correct at the time of printing. The advice contained in this article is for general information only and should not be taken as financial advice. Please make sure to speak to a qualified professional person before making any investment decision.
